An individualized way to safeguard your shoulders - Shoulder (P)rehab with Elastic Bands
For quite some time I was a skeptic when it came to elastic bands, but I reversed my opinion once I realized the potential that they have.
They are cheap. You can easily get them. They weigh nothing and don’t take up any space. This means you can own several bands and you can always have one with you.
But most importantly: they work.
And they work differently than free weights or body weight exercises.
We love upper body bodyweight strength training, but for rehab purposes or for people who are older or not very fit it is not always suitable.
Weights can be good, and we use them as well, but elastic bands offer a different stimulus. It is a stimulus that I feel can be very helpful if you are injured or want to prevent injury.
With elastic bands you can easily work in all sorts of angles, statically and dynamically. That is often more difficult to do with weights: since the weight is subject to the gravitational pull, the vector of resistance is always down. In contrast, elastic bands have internal resistance that is not bound to gravity. They would work even on the moon. While that is not relevant for us, it means bands can be a way to train all sorts of angles even if you’re not very acrobatic.
Thus, the bands allow you to train with high variety.
As I’ve written elsewhere many times, variety is key to our approach to healing from and preventing injuries.
We call this the “shotgun-approach” to healing injuries. It allows people with little knowledge to find solutions for their injuries. It empowers people.
The idea is that if you do a high variety of movements (with low intensity in the beginning) and moderate volume of each movement, you expose yourself to potential wins. If you “listen” to the effects of the various movements, you can find out what is good for your healing process and what is not helpful.
We call it the “Shotgun-approach” because you are not shooting at a select target with great precision, but rather trying out lots of exercises. The large spread of the shot means some of it will hit. From there you can move on to more precise things.
But eventually finding the precise exercises that help your injury is only one side of the coin. The other side is the diversity of movement.
The shoulder is our most mobile joint. It moves in more ways than any other joint in our bodies. We need to move it in a diverse way to keep this mobility alive. Not using the shoulder the way it is supposed to be used is asking for trouble. The mobility of your joints is an opportunity, but it is also a demand. You need to move. Otherwise, you will be more likely to have pains and aches.
The shoulder-girdle can do lots of different movement combinations. Do them.
Simply bringing more diversity to what you are doing can be enough to heal many injuries.
The elastic bands can provide this variety in various intensities.
Working with the elastic band is a form of strength training, because it creates resistance that you work against. But with a light enough band the resistance is not too high, which means you can do more variations.
Using the right band will offer a great combination of resistance and possible variability.
For most people, the right band will be a lighter one. It depends on your strength. Since the lighter bands are usually cheap, it should be no problem if you buy the wrong band in the beginning and need to change to another one.
How to work with the elastic band to heal your shoulder
It’s helpful to have two bands: one with more resistance and one with less. The exercise will determine which one to use. It doesn’t matter if the band is open-ended or a loop for these exercises. In the beginning it’s enough to have one rather light band.
You’ll also need something to attach the band to for some of the exercises. You can use a tree, a lamp post, Swedish bars or whatever works, but it’s good if you can adjust the height at which you attach the band.
The first thing to do is to distinguish the movement of the shoulder from the movement of the shoulder blades. In many of the exercises they will both move, but it’s helpful to be aware of their different functions and to be able to isolate them.
For most exercises we will look at unilateral (one arm) versions as well as bilateral (both arms). The unilateral versions are especially good for locating and balancing out potential imbalances between the sides, so it’s strongly recommended not to neglect them. When working on an injury, unilateral versions are often preferable as they prevent you from using the stronger side more.
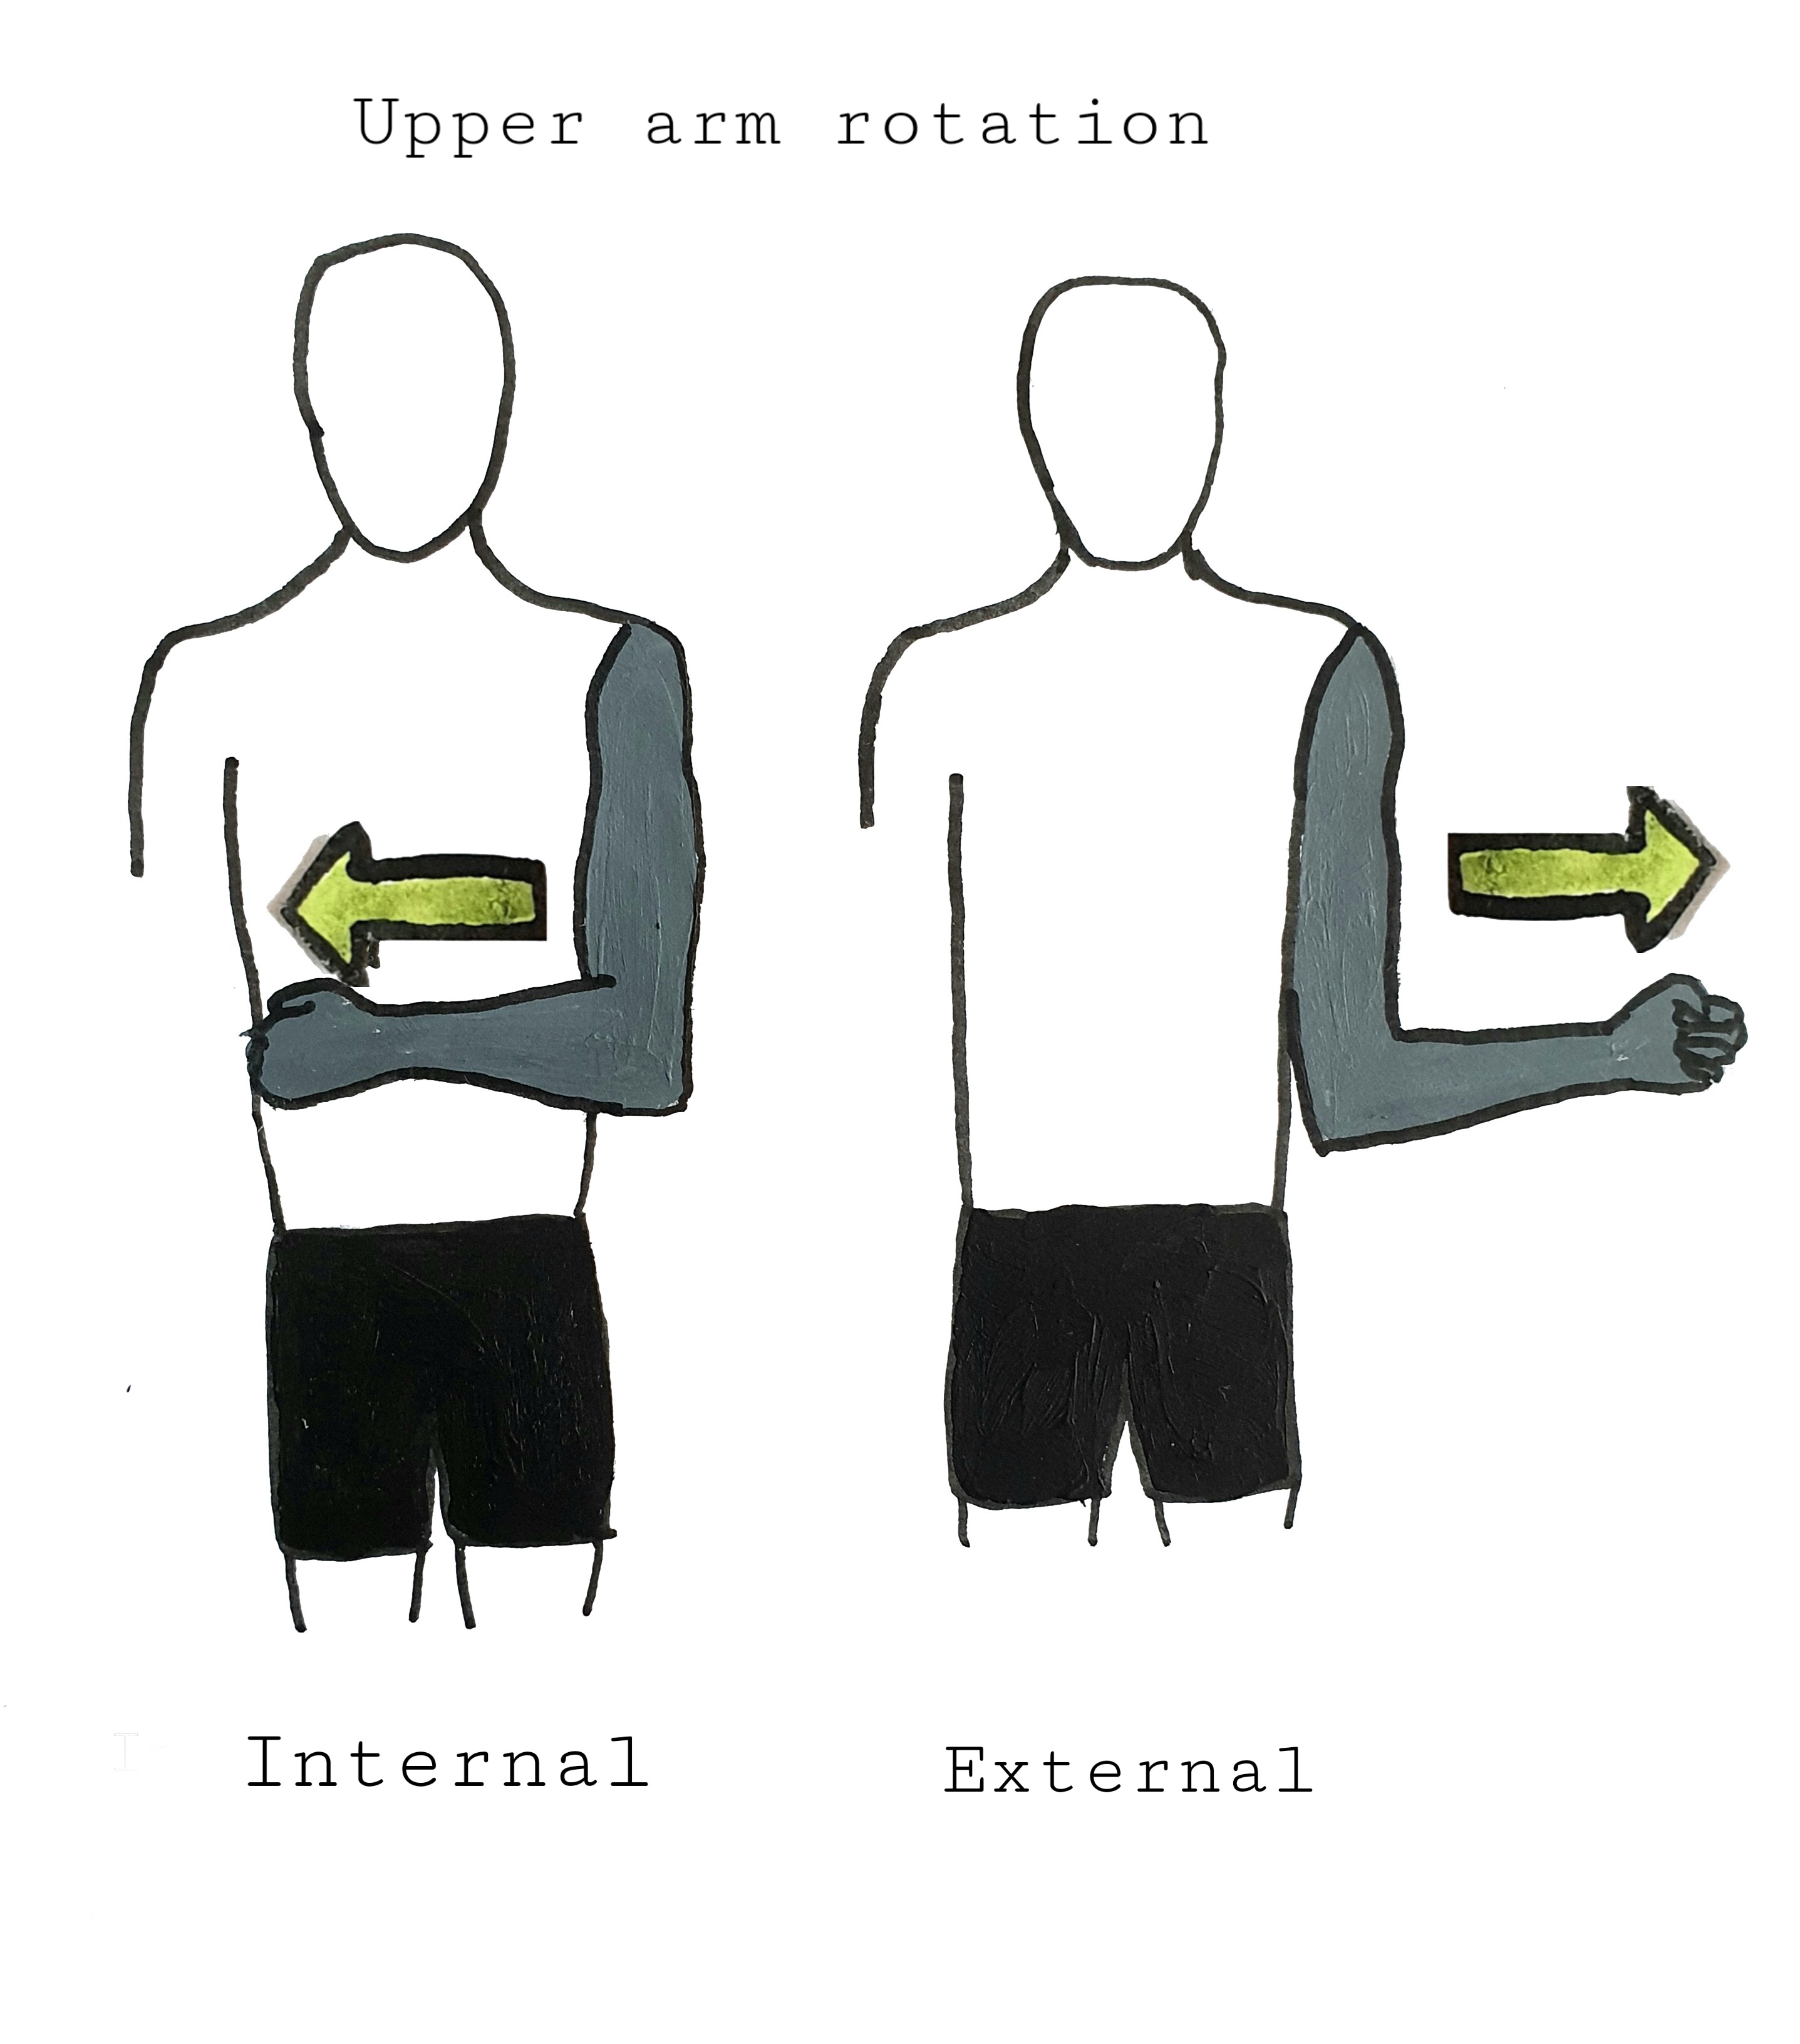
First, let’s look at the shoulder. To understand the movements, it helps to visualize how the humerus (the bone of the upper arm) moves in a three-dimensional plane. We can distinguish three different planes (although of course this is a bit of a simplification): horizontal, vertical, and rotational (internal and external).
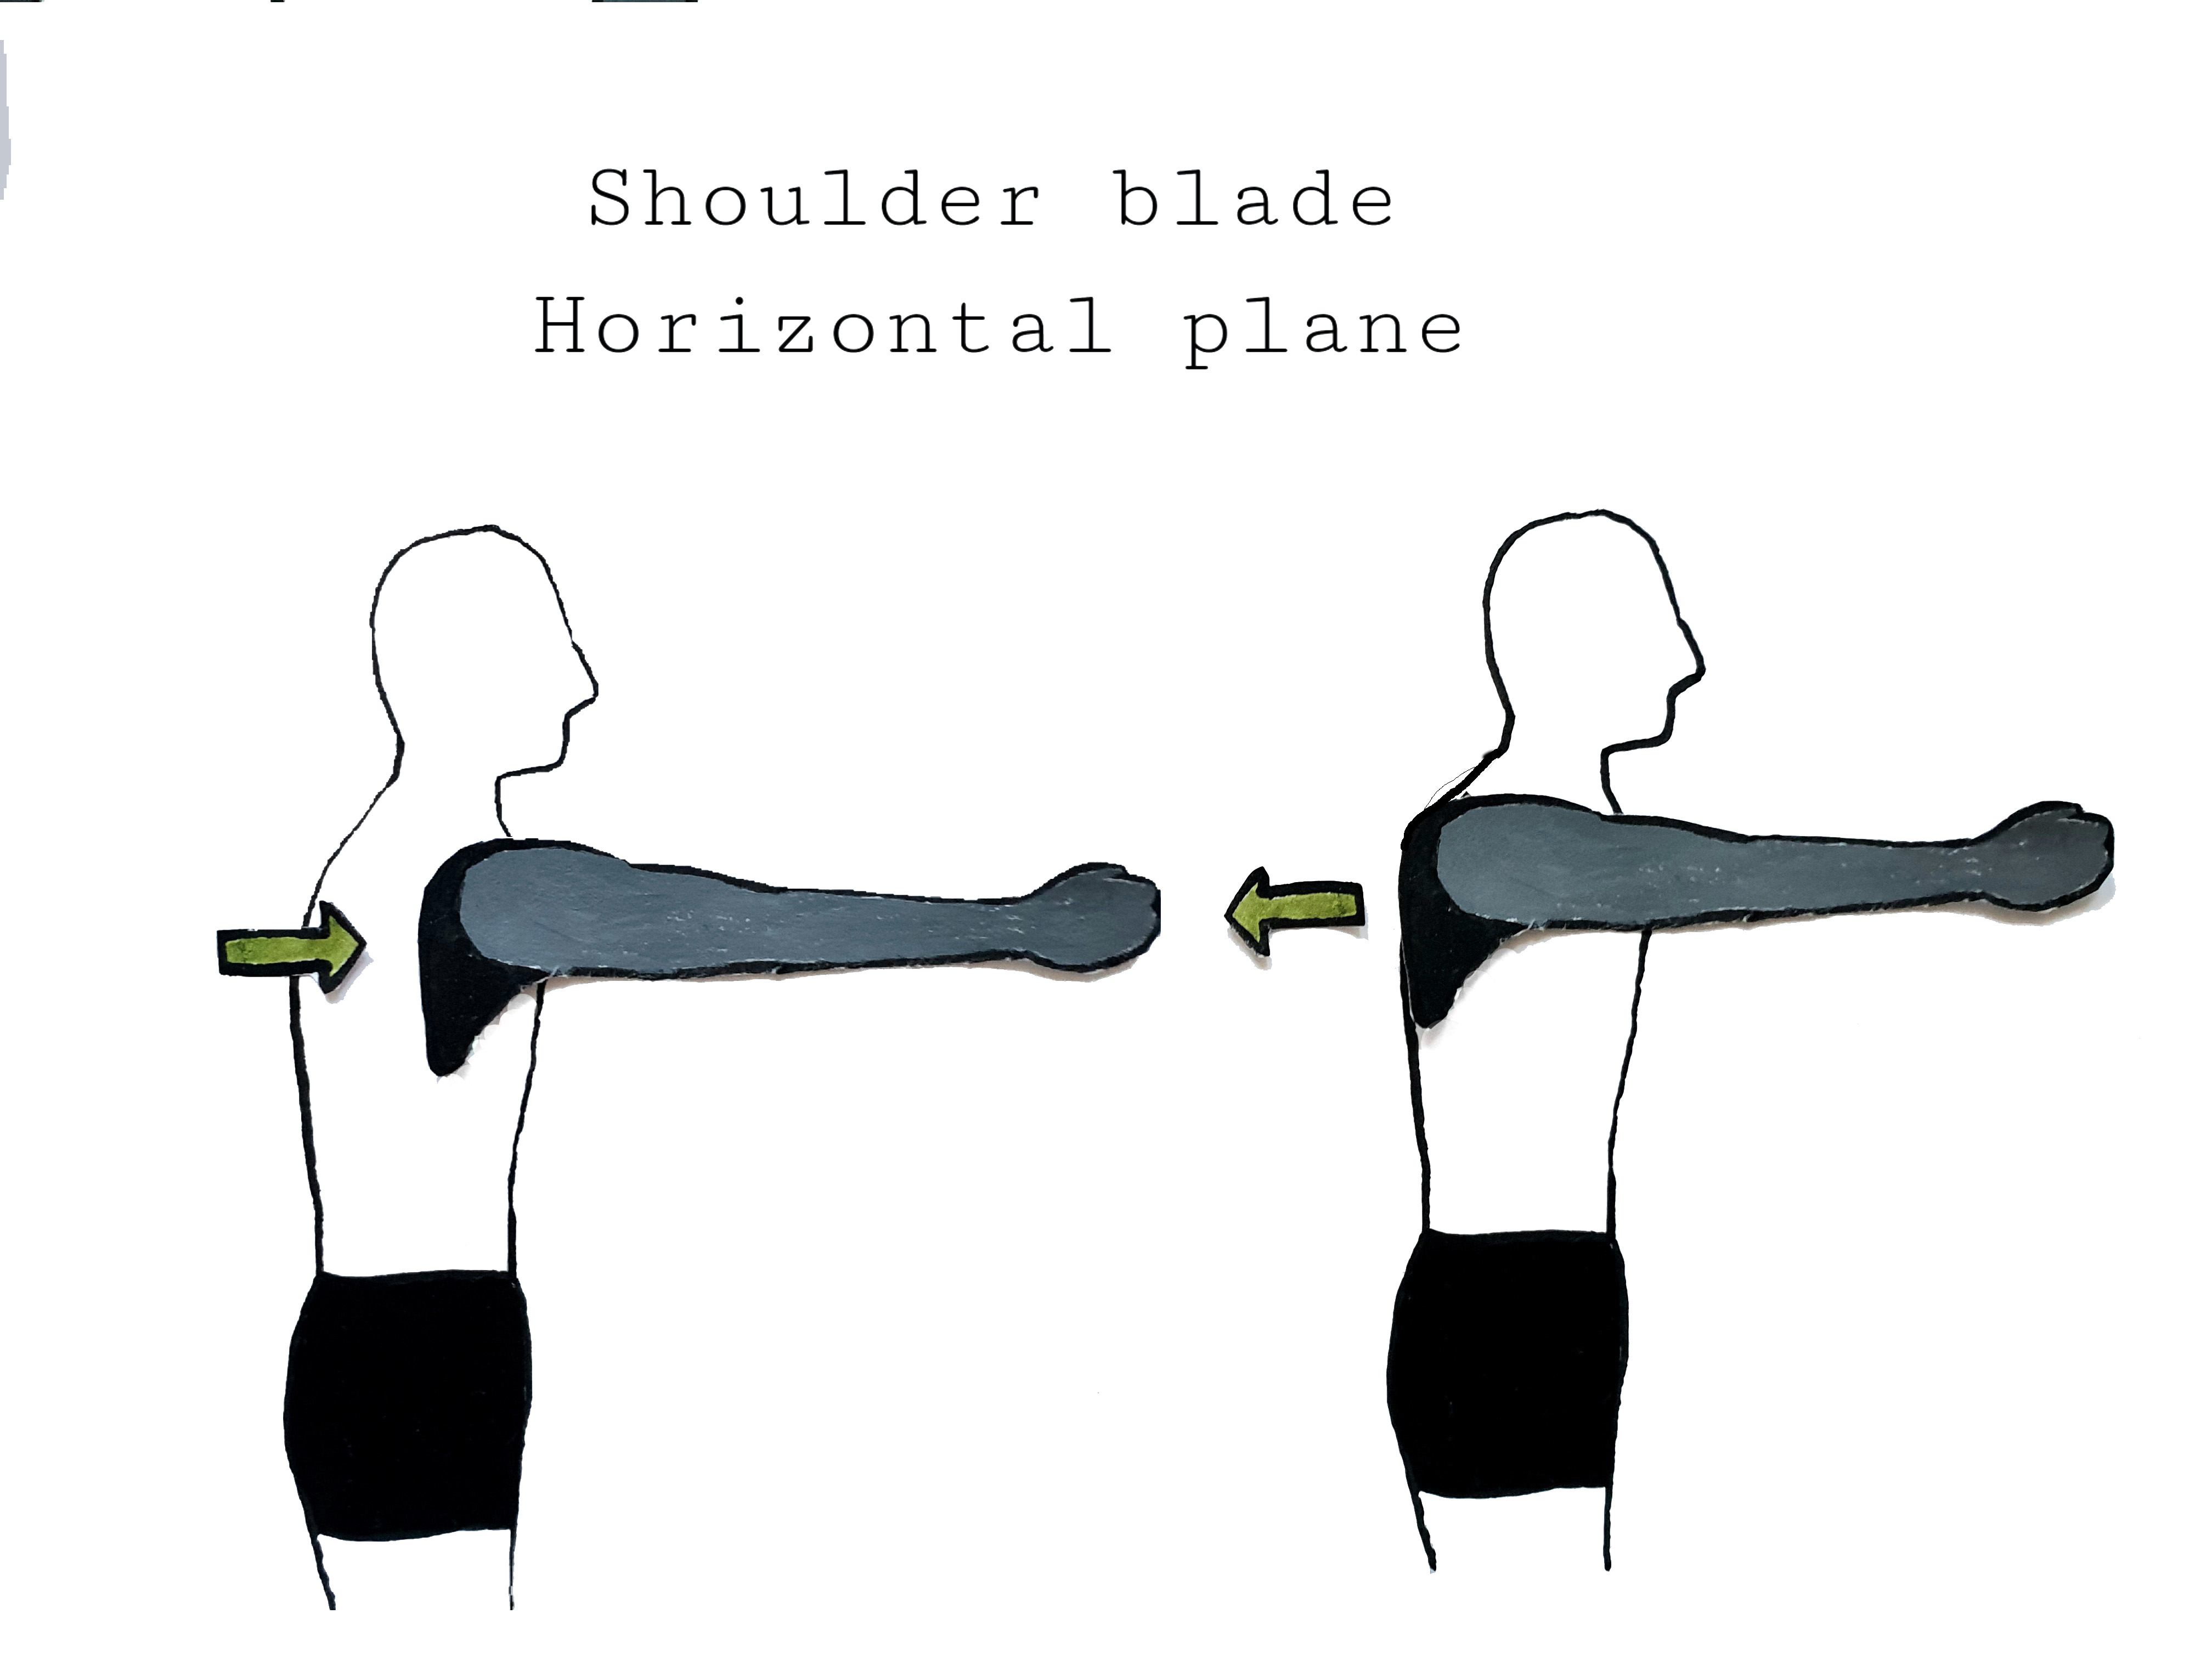
Moving on to the shoulder blades, we can distinguish three planes there as well. Horizontal (retraction and protraction, for those who are familiar with the latin terms), vertical (elevation and depression), and rotational. The rotation here is a bit harder to feel, but if I put my arms out to the sides and bring them up and down as if I’m swimming the breaststroke, the shoulderblades rotate.
To begin with, we will isolate these movements. While these exercises can be used as strength training, they are also a chance to work on an awareness of what moves and what doesn’t (similar to our SROMP work, for those familiar with that). You can play around with the intensity of the exercises adjusting how far apart your hands are in some exercises, and how far away from the attachment point you are in others.
Shoulder horizontal plane, bilateral 1: Front band pull apart.
Grab the band with both hands and hold it out in front of you with your arms straight. In a slow and controlled manner, pull the band apart, keeping the arms straight. Try to keep the shoulder blade in one spot, so that the movement comes from the shoulder. If seen from the side, the shoulder should not be moving back and forth or up and down. What moves is the arm in relation to the shoulder socket. You will notice that this version primarily targets the muscles of the shoulder
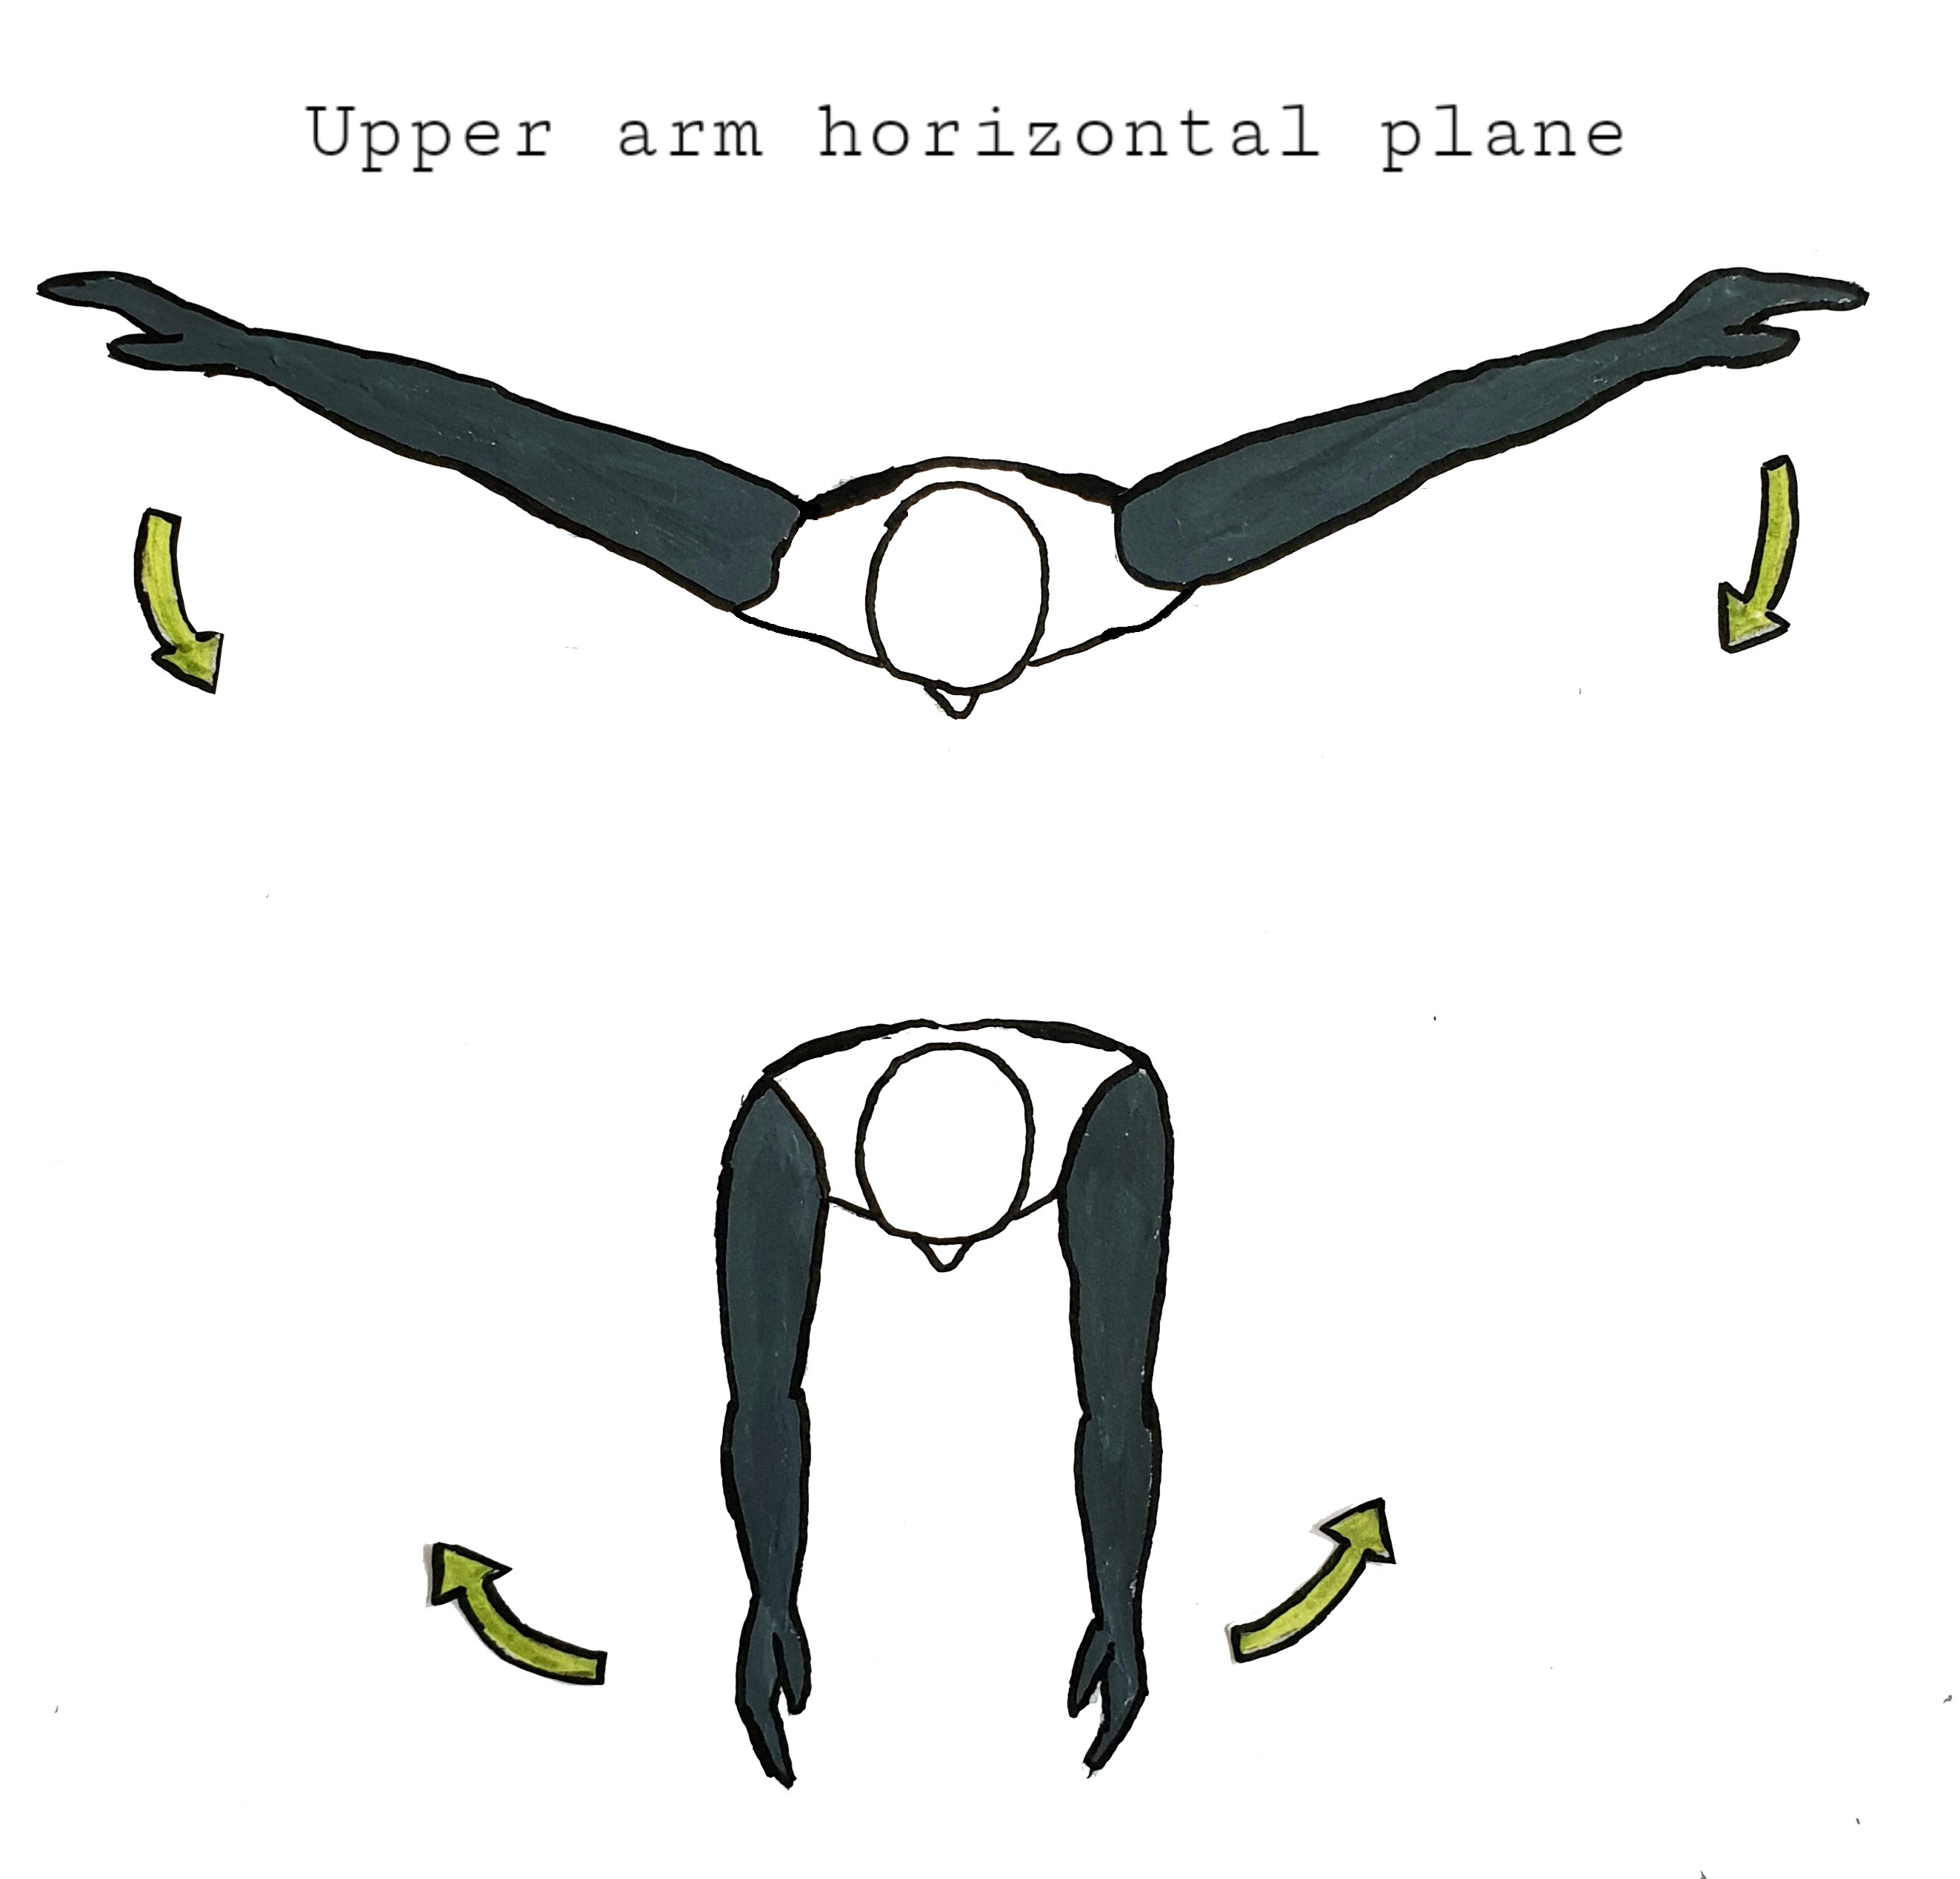
Shoulder horizontal plane shoulder, bilateral 2: Back band pull apart.
Grab the band with both arms out to your sides, arms straight, holding the band behind your back. Keeping the arms straight, pull them together as if you are trying to clap your hands. The band should remain behind your back, so that by performing the movement you are pulling it apart. As in the previous exercise, try to make sure only the arms are moving and the shoulder blades remain in one position. This exercise will work the muscles on the front of the shoulders and the chest.
Shoulder horizontal plane, unilateral:
Attach the band to your tree, post or whatever you are using. The band should be attached at the height of your shoulder. Position yourself at an angle where the band will not touch your body during the exercise. Again keeping the arm straight and the shoulder blade static, pull the band horizontally. The angle you stand at will make a big difference in where the exercise challenges you, so play around with different angles. Angles facing the attachment point will work the back muscles more, and angles facing away from it will primarily work the front.
Shoulder rotation, internal and external (unilateral):
Attach the band at the height of your elbow when your arms are down. For the most standard variation, stand at a 90-degree angle to the attachment point. With your elbow bent 90 degrees, use your shoulder to pull the band away from the attachment point. The elbow should remain in the same place in relation to the body throughout, touching the side of your torso. There are two major versions here which target different things. If you are pulling the band toward yourself, you are working the internal rotators. If you are pulling it away from you, the external rotators will be working more. For most people, the external rotation is under-developed, so it’s good to spend more time training those versions. Here you can again play around with different angles and distances from the attachment point in order to vary what precisely is targeted.
Shoulder vertical plane, bilateral:
Keeping your arms straight, grab the band with both hands. Hold the band overhead and pull the band apart to the sides and all the way down, then back up. The band travels behind your back. The main pull will be when the arms are horizontal. It’s not really possible to isolate the movement of the humerus from the movement of the shoulder blade in this version, as the shoulder blade will rotate. To more properly isolate the two, we need to go into versions where the arm travels at the front of the body.
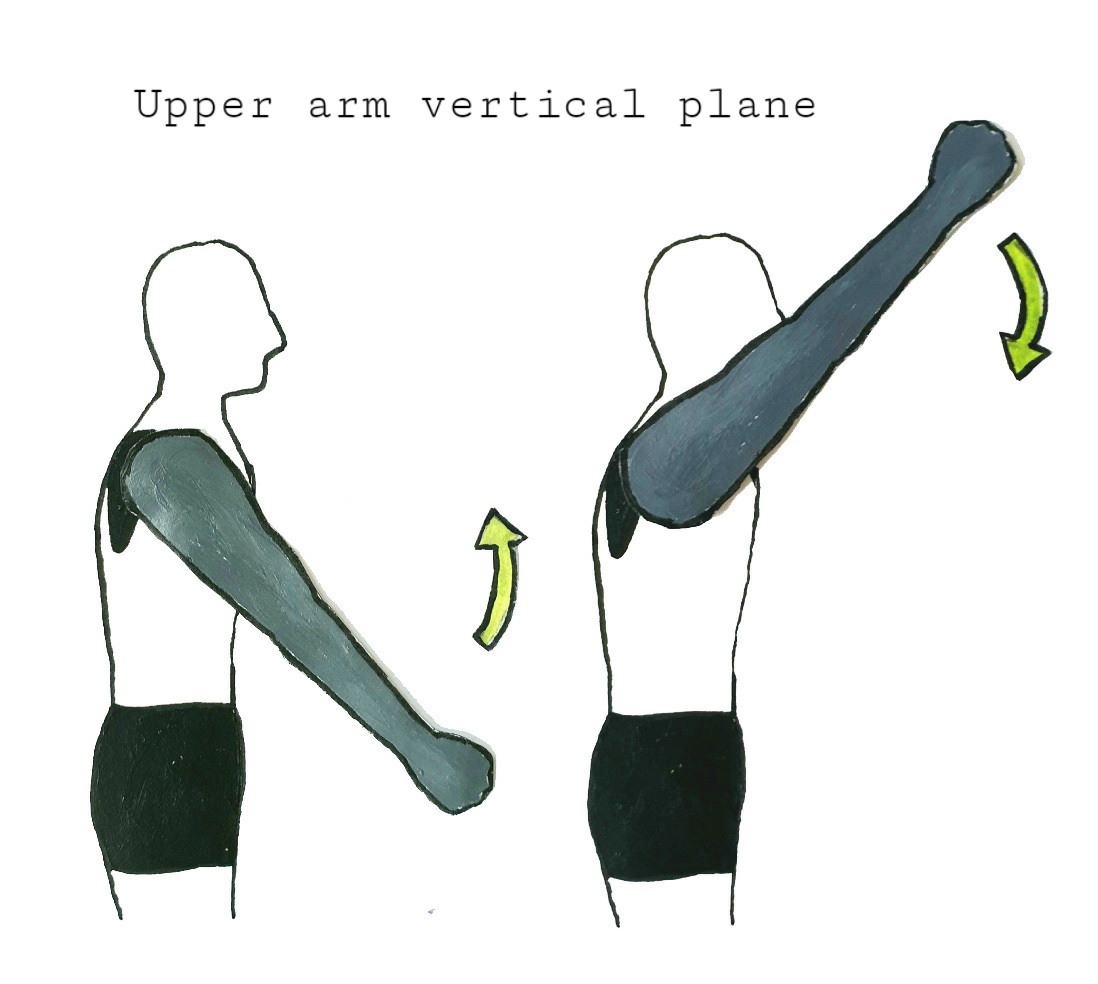
Shoulder vertical plane, unilateral:
Upward: Standing on one end of the band, grab the band with your arm straight. Keeping the arm straight, pull the band upward while keeping the shoulder in place in space. Play around with the angles.
Downward: Attach the band to a high spot. Pull it downward while keeping the arm straight and the shoulder in place. If it’s difficult to find an attachment spot high enough to give you resistance through the movement, you can do the exercise kneeling. Play around with the angles.
Shoulder blades, horizontal plane:
Attach the band to your tree or post at shoulder height or slightly below. You can also experiment a bit with the height of the attachment to change the exercise. Find a distance and a stance that makes sense for you where you can work. Facing the tree or post, keeping your arms straight, pull your shoulder blades back (retraction) as if doing the initial part of a row. Try to keep the shoulder down, away from your ear, and attempt to isolate the retracting movement.
You can also face away from the attachment point. Use the same cues, but this way the resistance will come when pushing the shoulder blades forward (protraction).
Both these exercises can also be done unilaterally.
Shoulder blades, vertical plane:
Standing on the band, hold the other end with one hand. You’ll likely need to grab the band so that it’s already a bit tense in the starting position, since the movement itself it rather small. Keeping the arm straight and parallel to the body, pull the band by lifting your shoulders up towards your ear. You can also do a version where you start with the arm straight up overhead, and then again try using lifting and lowering the shoulder by using the shoulder blade.
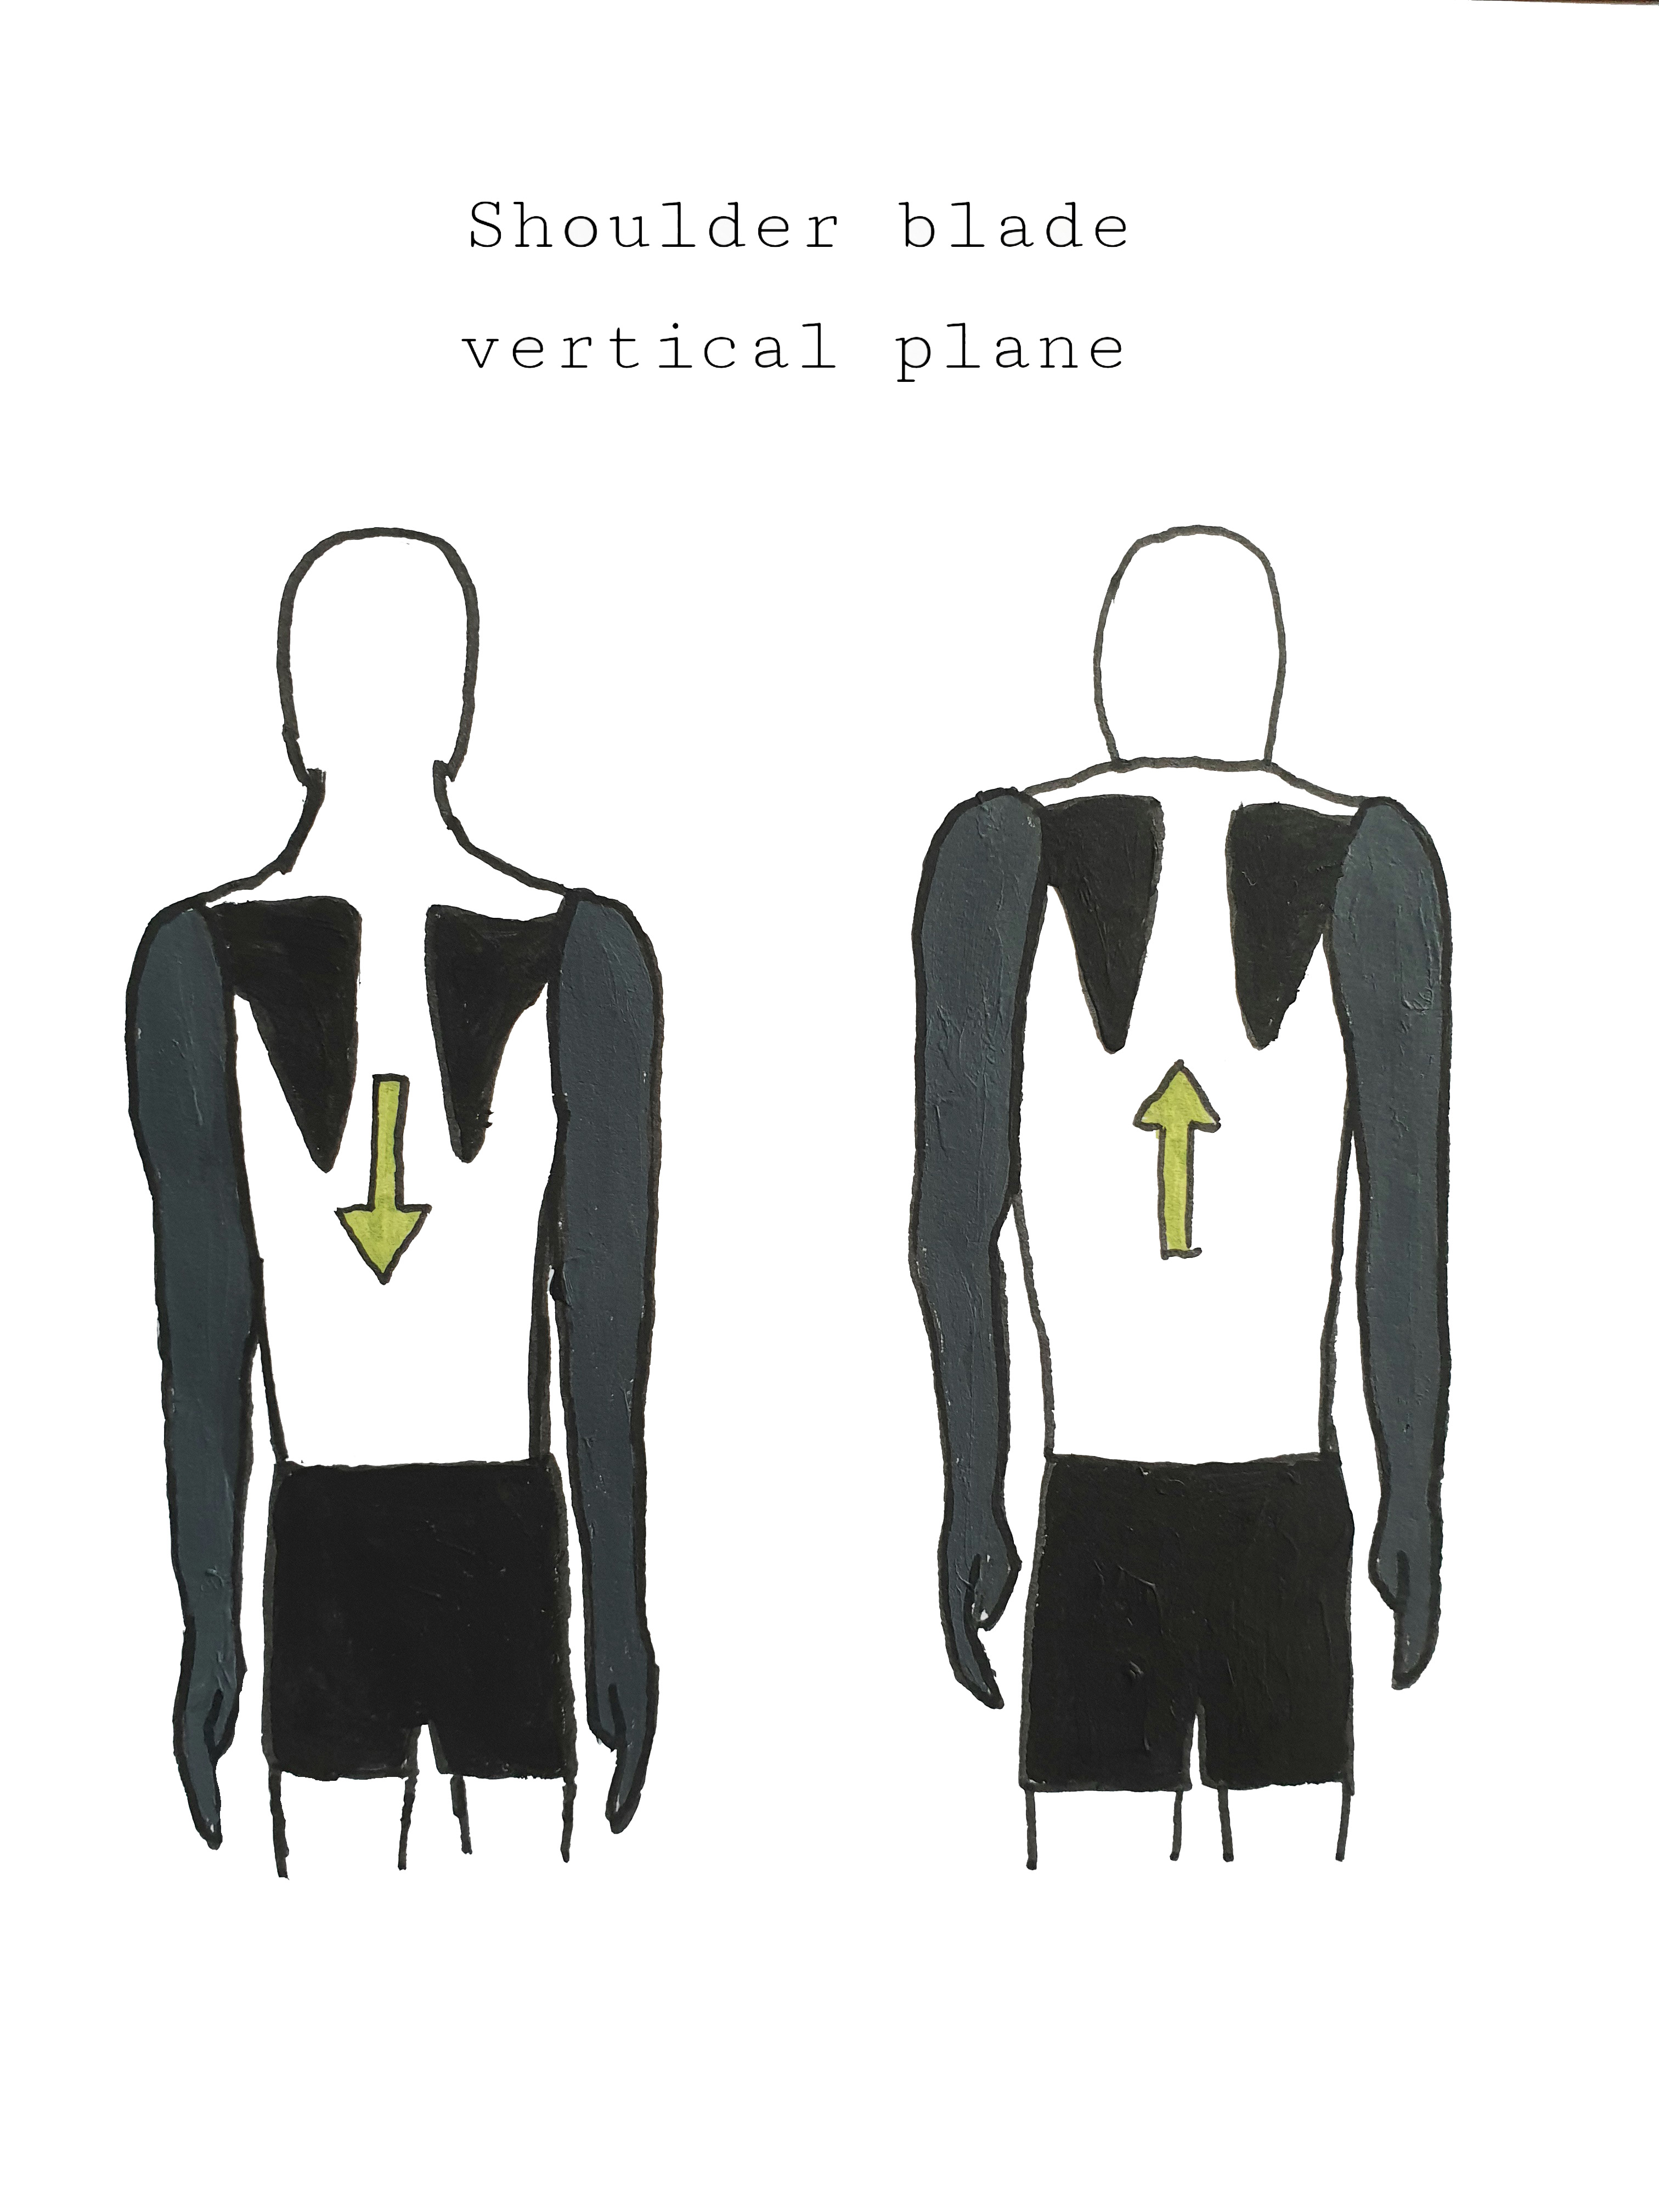
The other variation of this is pulling the shoulder down, away from your ear. For this, attach the band at a high spot. You may need to go into kneeling to get the proper resistance. Grab the band overhead with your arm straight and your shoulder lifted as in the end position of the previous version. From here, pull down through the shoulder blade so that the shoulders move away from the ear. You can play around with the angle of the arm. If you want to do a bilateral version of the exercise, simply attach the band in a way that allows you to pull on both ends.
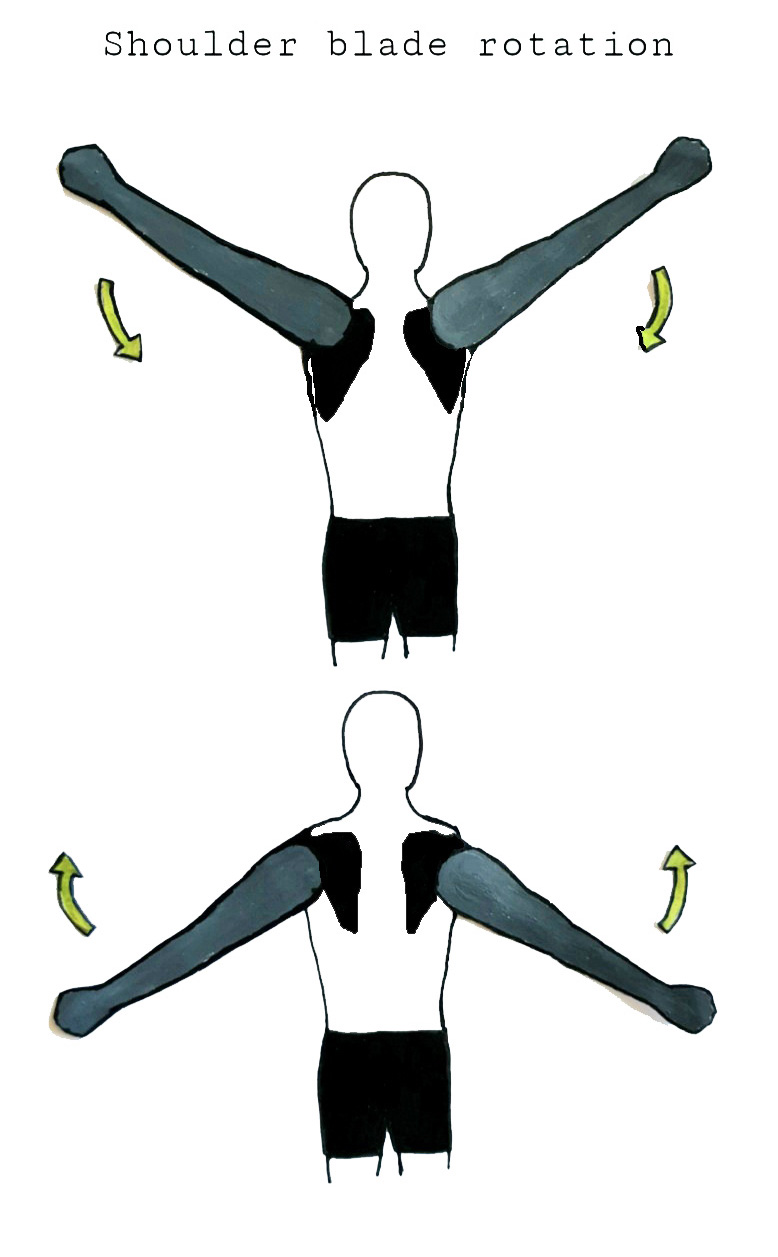
Shoulder blades, rotational plane:
We already looked at the bilateral version of this, since it is practically identical to the bilateral vertical shoulder exercise. To repeat:
Keeping your arms straight, grab the band with both hands. Hold the band overhead and pull the band apart to the sides and all the way down, then back up. The band travels behind your back. The main pull will be when the arms are horizontal.
Unilateral: pull down, or stand on band and pull up
Final Words
Once you have an understanding of the basic movements, you can start combining them and experimenting more freely. Play around with it. See how many different movements you can do with the band. When you find something that you feel would be particularly good for you, or an imbalance between your sides, work on that movement a bit more focused for a while. Just make sure to continually go back to experimenting. Use the band as a diagnostic tool to find weak spots or imbalances, and you may be able to rehabilitate injuries before they’ve even become noticeable.
Joseph Bartz & Oskar Henke 21.04.2022